» Veranstaltungen

» Navigation
» über uns
|
-
 Kleiner Guide: CamillaDSP plus Audio Injector Octo 6x8 Interface an Raspberry Pi 4 Kleiner Guide: CamillaDSP plus Audio Injector Octo 6x8 Interface an Raspberry Pi 4

Moin Leute,
mit CamillaDSP gibt es eine sehr leistungsfähige Softwarelösung für Raumkorrektur, Frequenzweichen und Co. Zudem ist die Sache noch sehr komfortabel via Webinterface zu bedienen.
Leider sind Mehrkanal-Audiointerfaces für den Raspberry Pi rar gesät. Fündig wird man da eher im Musikerbereich mit professionellen Interfaces, die aber oft viel zu viele Funktionen bieten und gar nicht benötigt werden.
Sucht man eine integrierbare Lösung etwa für einen Verstärkerbau, ist man aufgeschmissen. Für mich recht unverständlich, warum es keine 4 Kanal DACs gibt - 2 Wege vollaktiv zu fahren, ist jetzt kein besonders außergewöhnliches Konzept.
Vor einiger Zeit gab es dann ein Kickstarter Projekt für eine Mehrkanalsoundkarte für den RPi. Der Audio Injector Octo bietet 6 Ein- und 8 Ausgänge.
Das Board kann man noch immer kaufen auf Aliexpress oder noch günstiger auf Alibaba. (https://www.alibaba.com/product-deta...2bf513a0TkqCU7)
Ich habe mal eins bestellt, weil ich sonst keine volintegrierbare Lösung für einen 4 Kanalverstärker mit CamillaDSP fand.
Leider ist das Projekt verwaist und auf Github klagen die Nutzer über allerlei Probleme mit der Soundkarte. https://github.com/Audio-Injector/Octo/issues
Auch ich habe fast aufgegeben, nachdem ich das Ding endlich halbwegs zum Laufen bekommen hatte. Bei jedem Neustart änderte sich das Kanalrouting,
was für einen Hochtöner fatal sein kann.
Doch ich fand dann doch noch eine Lösung nach ewigem Probieren. Der Schlüssel liegt darin, die JACK Audio API zu verwenden. Das fixt nicht nur die routing Probleme sondern
ermöglicht darüber hinaus eine fast latenzfreie Wiedergabe durch real-time Kernelanbindung. Nun lässt sich das System sogar für die Musikproduktion nutzen.
Vorher war die Latenz zu groß, um Noten direkt einspielen zu können.
Ich habe einen Guide verfasst, der die Installation beschreibt. Günstiger kann man sich keinen so leistungsfähigen Signalprozessor bauen. Auch Multiroomanwendungen sind damit möglich.
Über die klangliche Güte des Octos kann ich nichts sagen. Super highend wird das sicher nicht sein. Im A/B Vergleich mit einem hochwertigen Audiointerface konnte
ich aber auch keine relevanten Unterschiede feststellen. Ich bin da aber auch nicht sonderlich fixiert - die Musik und der Vibe stehen im Vordergrund.
Hier der Guide:
Code:
Raspberry Pi 4 with Audio Injector Octo Installation Guide
NOTE: This guide shows how to install the Octo audio interface along with CamillaDSP and the JACK Audio API on an RPi 4 without random
channel swapping issues. All other audio interfaces of the Pi are disabled in this example. The result is a very low latency audio system.
1. Basic Installation
1.1 Install the Operating System:
Use Raspberry Pi Imager
OS: Raspberry Pi OS Lite (64-bit)
Set up network, SSH, and user account (this guide assumes the username is pi; if using a different username, adjust
commands accordingly).
1.2 Update the System:
sudo apt update && sudo apt full-upgrade -y
2. Audio Configuration
2.1 Edit config.txt:
sudo nano /boot/firmware/config.txt
#Edit these entries or add if non-existent:
dtparam=i2c_arm=on
dtparam=i2s=on
dtparam=spi=on
#dtparam=audio=on
dtoverlay=vc4-kms-v3d,noaudio
#at the very bottom of the file add:
dtoverlay=audioinjector-addons
#save and reboot
3. Install JACK Audio Server
3.1 Install JACK with real time permission:
sudo apt install jackd2
3.2 Configure Real-Time Priority:
sudo adduser $USER audio #most likely already added
sudo nano /etc/security/limits.d/audio.conf
#Content looks like:
@audio - rtprio 95
@audio - memlock unlimited
#@audio - nice -19
3.3 Install Development Packages:
sudo apt install -y build-essential git cmake pkg-config libasound2-dev libjack-jackd2-dev libsamplerate0-dev
3.4 Set Up JACK Autostart Service:
sudo nano /etc/systemd/system/jackd.service
#Content:
[Unit]
Description=JACK Audio Daemon
After=alsa-restore.service
Requires=alsa-restore.service
[Service]
User=pi
Environment=JACK_NO_AUDIO_RESERVATION=1
LimitRTPRIO=95
LimitMEMLOCK=infinity
ExecStart=/usr/bin/jackd -P95 -d alsa -d hw:0 -r 48000 -p 128 -n 3
Restart=on-failure
[Install]
WantedBy=multi-user.target
#Enable and start the service:
sudo systemctl enable jackd.service
sudo systemctl start jackd.service
sudo reboot
#Check if Jack is running properly:
sudo systemctl status jackd.service
4. Install CamillaDSP
4.1 Install Rust and Cargo:
curl --proto '=https' --tlsv1.2 -sSf https://sh.rustup.rs | sh
#reboot
4.2 Install Dependencies:
sudo apt update
sudo apt install git
4.3 Clone CamillaDSP:
git clone https://github.com/HEnquist/camilladsp.git
cd camilladsp
4.4 Compile with JACK Support:
RUSTFLAGS='-C target-feature=+neon -C target-cpu=native' cargo build --release --features jack-backend,websocket
4.5 Create Service Files:
mkdir -p ~/camilladsp/coeffs ~/camilladsp/configs
sudo wget https://raw.githubusercontent.com/md...lladsp.service -O /lib/systemd/system/camilladsp.service
4.6 Adjust ExecStart in Service File and change username:
sudo nano /lib/systemd/system/camilladsp.service
#add your username username
#Change this line to:
ExecStart=/home/pi/camilladsp/target/release/camilladsp -s /home/pi/camilladsp/statefile.yml -w -g-0 -o /home/pi/camilladsp/camilladsp.log -p 1234
4.7 Enable and Start Service:
sudo systemctl enable camilladsp
sudo service camilladsp start
5. Install CamillaDSP GUI
5.1 Install Web Interface:
wget https://github.com/HEnquist/camillag...aarch64.tar.gz -O ~/camilladsp/bundle_linux_aarch64.tar.gz
sudo tar -xvf ~/camilladsp/bundle_linux_aarch64.tar.gz -C /opt/
5.2 Set Up GUI Service:
sudo wget https://raw.githubusercontent.com/md...llagui.service -O /lib/systemd/system/camillagui.service
sudo nano /lib/systemd/system/camillagui.service # Adjust username if needed
5.3 Enable and Start GUI Service:
sudo systemctl enable camillagui
sudo service camillagui start
5.4 Reboot:
sudo reboot
6. Verification
#Check status:
sudo systemctl status jackd.service
sudo systemctl status camilladsp
sudo systemctl status camillagui
#Web Interface:
http://<yourPI-IP>:5005/gui/index.html
7. Kernel Downgrade (Required, otherwise Octo will not work!)
sudo rpi-update f5c4fc199c8d8423cb427e509563737d1ac21f3c
sudo reboot
8. Camilla setup
In the Camilla webgui under "Devices" > Capture & Playback Devices choose JACK
Chunksize can be reduced for very low latency values - 32 is absolutely safe.
Check ExecStart=/usr/bin/jackd -P95 -d alsa -d hw:0 -r 48000 -p 128 -n 3 in ExecStart=/usr/bin/jackd -P95 -d alsa -d hw:0 -r 48000 -p 128 -n 3 for
further latency adjustmens.
From here it is experimentation.
Create a new config under "Files" and mark it as active (the star button)
On the left hand side click "Apply and save".
You might need to adjust recording levels in alsamixer.
DONE!
Geändert von MOD Slaughthammer (08.08.2025 um 20:34 Uhr)
Grund: Lesbarkeit verbessert, Zeilenumbrüche eingefügt.
-
Hallo Malik,
vielen DAnk für diesen Guide. Ich hab so eine audioinjector schon seit langem (noch aus den Zeiten des Startups). Damals hab ich sie in einer Konfiguration mit Volumio und brutefir zum Laufen gebracht als 8-Kanal-System (Camilla gab's da noch nicht - zumindest hatte ich noch nie davon gehört).
Aber dann hatte ich keine konkrete Verwendung, hab den PI (3+) zur Seite gelegt und nach Jahren das gesicherte Image wieder installiert und .. nix lief mehr. Ich hatte nicht mehr den Nerv auf Fehlersuche zu gehen und da liegt sie nun ...
Mit deinem Guide hab ich wieder etwas Lust bekommen, das Ding wieder auszugraben. Danke.
Eines möcht eich aber anmerken: Mit ADAU1701 DSP-Chips von Wondom oder anderen, sei es als Boards, als Fertiggerät (DSP Box) oder mit Verstärkern integriert, kann man auch recht günstig DSP kriegen.
Ist halt Hardware näher und nicht so anfällig für die SW-Änderungen beim PI. Aber wer gerne mit Audiolösungen auf dem PI spielt hat hier eine schöne Spielwiese. Da die verbauten DACs in der Octo-Card schon recht gut sind, ist der Klang schon mehr als ordentlich.
Gruß
-
Danke. Drei Fragen:
- Hast Du Dein Board von aliexpress vom China Australia store? Die beiden Bewertungen zum Board sind ja übel.
- Kann man bei Ali als Privatkunde problemslos bestellen?
- Das mit dem Kerneldowngrade: liegt das am Board oder an Camilla? Sind da nicht zukünftige Inkombatibilitäten zu erwarten, wenn Camilla irgendwann keine alten Kernels unterstützt?
-
 Zitat von kasbc

Hallo Malik,
vielen DAnk für diesen Guide...
Gerne! Camilla sollte viel mehr genutzt werden. Es ist einfach ein tolles Projekt, das jegliche Unterstützung verdient. Die Rechenpower des RPis ist den dedizierten DSP Chips
deutlich überlegen.
Ich nutze hier mehrere miniDSP und auch Wondom Boards. Gerade letztere sind mit diesem Gefummel mit Programmer und dem elenden Sigmastudio jedoch ein Krampf und einfach
nicht mehr zeitgemäß. Camilla ist mit seinem Webinterface absolut komfortabel zu bedienen. Presets können schnell geändert oder sogar hardcodiert und auf Buttons gelegt werden.
So kann Camilla mit Octo auch die Quellenwahl übernehmen und als Vorverstärker mit 3 Eingängen fungieren.
Zudem ist man in der Wahl der Audiointerfaces und Schnittstellen absolut frei. Zusammen mit Volumio kann man auf kleinstem Raum einen sehr leistungsfähigen Streamer/Vorverstärker/Signalprozesor aufbauen.
-
Zitat von capslock
Danke. Drei Fragen:
- Hast Du Dein Board von aliexpress vom China Australia store? Die beiden Bewertungen zum Board sind ja übel.
- Kann man bei Ali als Privatkunde problemslos bestellen?
- Das mit dem Kerneldowngrade: liegt das am Board oder an Camilla? Sind da nicht zukünftige Inkombatibilitäten zu erwarten, wenn Camilla irgendwann keine alten Kernels unterstützt?
Ich habe mein Board von Alibaba. Da kann man auch als Privatperson bestellen. Ich mache das ständig.
Die beiden Bewertungen lassen sich so nicht verifizieren. In einem Fall ist möglicherweise tatsächlich ein fehlerhaftes Board verschickt worden oder der Nutzer schlicht zu doof gewesen.
Die zweite Bewertung rührt daher, dass der Käufer nicht in der Lage war, sich in die Materie einzuarbeiten.
Zugegeben, es ist tricky - ich habe eine Woche gebraucht, um dahinter zu kommen. Niemand sonst hat bisher eine Anleitung verfasst, wie man das Ding zuverlässig zum Laufen bekommt.
Vielleicht kann der Guide dazu beitragen, das Projekt ein wenig zu "rehabilitieren" und aus der Versenkung zu holen. Denn, wie erwähnt, gibt es sonst so gut wie keine Mehrkanallösungen für den RPi.
Das Kerneldowngrade liegt am Board bzw am CS42448 Chip. Wenn ich mich richtig erinnere, bietet Linux ab Kernel 6 einen nativen Multichannelsupport, was zu Konflikten mit dem Octo Treiber führt. https://github.com/Audio-Injector/Oc...ent-1761322944
Sollte Camilla aus irgendwelchen Gründen keine älteren Kernels unterstützen, kann man immer noch eine ältere Version nutzen. Auf Github findet man ja sämtliche Versionen.
Ich mach mir da keine Gedanken.
-
Vollaktiv per DSP

Super, vielen Dank dafür! Insbesondere so eine detaillierte Anleitung zum Aufsetzen von CamillaDSP fehlte mir noch, das steht bei mir demnächst auch noch an. Bisher hab ich da immer Distros genutzt die das mitgebracht haben.
Ich mache ja auch immer mal wieder mit RasPis für Audiozwecke rum. Ich habe dabei bisher immer die Logilink UA0099 als Audiointerface genutzt, ist halt konkurenzlos günstig und performt in den Messwerten ganz OK.
Es gibt da jetzt seit einiger Zeit was neues:
https://www.hifiberry.com/shop/boards/hifiberry-dac8x/
Allerdings nur mit dem Pi5 kompatibel, sonst hätte ich die schon getestet. Habe hier nur 2, 3 und 4 vor Ort.
Gruß, Onno
wissen ist macht. nicht wissen macht auch nichts.
-
Ich werde noch ein Script erstellen, was man einfach ausführen kann und am Ende das fertige System erhält.
Wenn noch jemand Ahnung hat, wie man korrekt einen Realtime Kernel kompiliert, gerne her mit den Infos. Das ist mir teilweise echt zu hoch.
-
Hier ist das Script.
Leichter kann man das Setup nicht durchführen.
Vorbereitung:
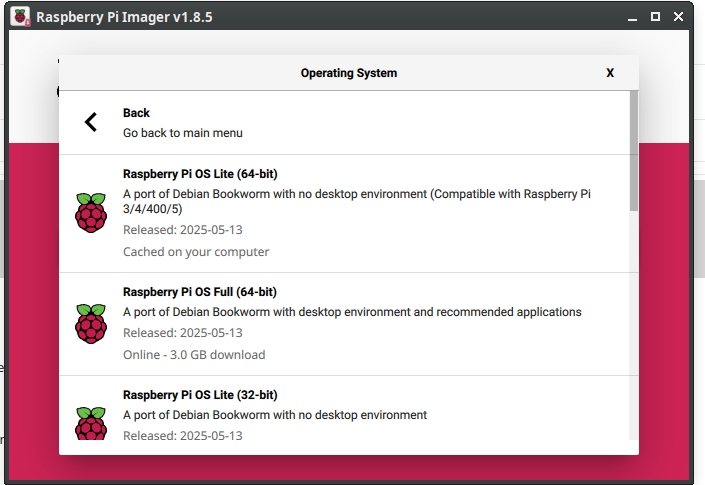
Zuerst mit dem Pi Imager unter Raspberry Pi OS (other) das Pi Os lite 64bit wählen. (Ihr könnt auch die Desktop-Variante nutzen, falls ihr einen Bildschirm am RPi nutzt)
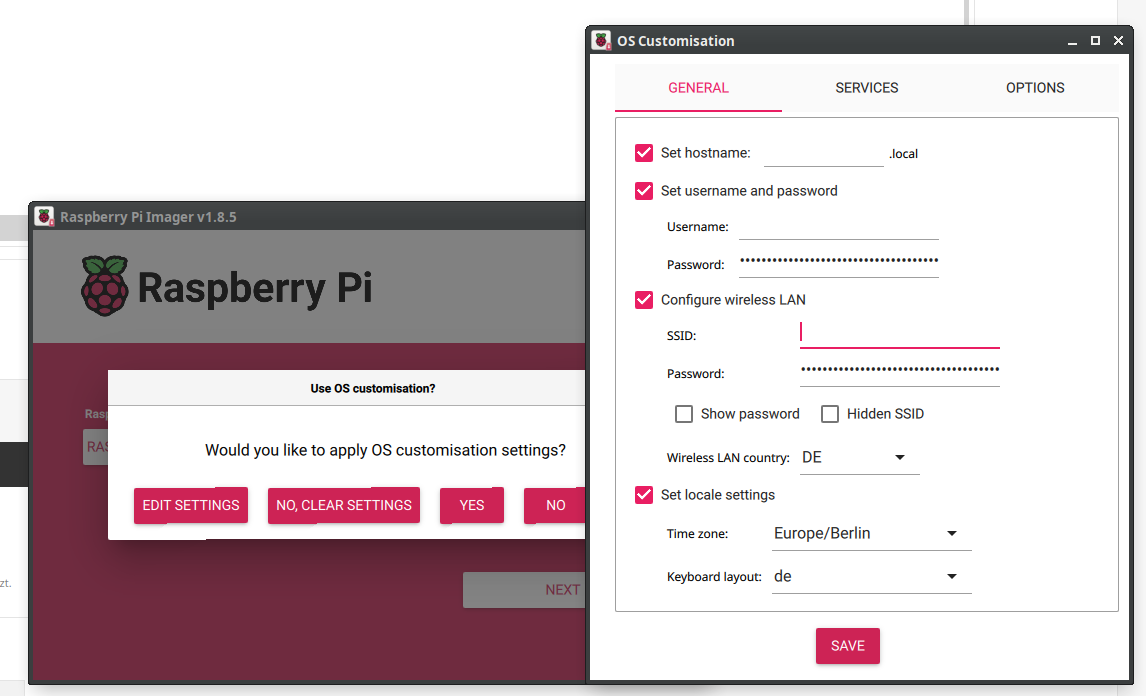
Dann unter "Edit Settings" eure Netzwerkzugänge und Username definieren. Unter "Services" SSH aktivieren (password authentication).
Speichern und mit den Settings die SD flashen.
Warten, bis der Vorgang abgeschlossen ist.
Jetzt folgendes Script als setup_octo_audio.sh mit einem Texteditor speichern:
Code:
#!/bin/bash
#
# This script automates the installation of audio hardware and software
# for Octo audio on a Raspberry Pi running 64-bit Raspberry Pi OS Lite.
#
# It is designed to be idempotent, meaning it can be safely run multiple times.
# After a reboot is required, simply re-run the script to continue the setup.

set -e

STATE_FILE="$HOME/.audio_setup_state"

# Function to log messages
log() {
    echo "[INFO] $(date +'%T') - $1"
}

# Function to check if a step is done
is_done() {
    grep -q "$1" "$STATE_FILE" 2>/dev/null
}

# Function to mark a step as done
mark_done() {
    echo "$1" >> "$STATE_FILE"
}

# --- Step Functions ---

step_1_update_system() {
    log "Step 1: Updating the system..."
    sudo apt update && sudo apt full-upgrade -y
    mark_done "step_1_update_system"
    log "System update complete."
}

step_2_configure_audio() {
    log "Step 2: Configuring audio in /boot/firmware/config.txt..."
    CONFIG_FILE="/boot/firmware/config.txt"

    # Ensure required dtparam entries exist and are not commented out
    sudo sed -i 's/^#*\s*dtparam=i2c_arm=on/dtparam=i2c_arm=on/' "$CONFIG_FILE"
    grep -q "^dtparam=i2c_arm=on" "$CONFIG_FILE" || echo "dtparam=i2c_arm=on" | sudo tee -a "$CONFIG_FILE" > /dev/null

    sudo sed -i 's/^#*\s*dtparam=i2s=on/dtparam=i2s=on/' "$CONFIG_FILE"
    grep -q "^dtparam=i2s=on" "$CONFIG_FILE" || echo "dtparam=i2s=on" | sudo tee -a "$CONFIG_FILE" > /dev/null

    sudo sed -i 's/^#*\s*dtparam=spi=on/dtparam=spi=on/' "$CONFIG_FILE"
    grep -q "^dtparam=spi=on" "$CONFIG_FILE" || echo "dtparam=spi=on" | sudo tee -a "$CONFIG_FILE" > /dev/null

    # Ensure dtparam=audio=on is commented out
    sudo sed -i 's/^\s*dtparam=audio=on/#dtparam=audio=on/' "$CONFIG_FILE"

    # Ensure vc4-kms-v3d,noaudio overlay is present and not duplicated
    if grep -q "^dtoverlay=vc4-kms-v3d" "$CONFIG_FILE"; then
        # Line exists, ensure it's correct
        sudo sed -i 's/\(dtoverlay=vc4-kms-v3d\).*/\1,noaudio/' "$CONFIG_FILE"
    else
        # Line does not exist, add it
        echo "dtoverlay=vc4-kms-v3d,noaudio" | sudo tee -a "$CONFIG_FILE" > /dev/null
    fi

    # Ensure audioinjector-addons overlay is present at the end
    grep -q "^dtoverlay=audioinjector-addons" "$CONFIG_FILE" || echo -e "\n# For Octo Audio\ndtoverlay=audioinjector-addons" | sudo tee -a "$CONFIG_FILE" > /dev/null

    mark_done "step_2_configure_audio"
    log "Audio configuration complete. A reboot is required."
    read -p "Press Enter to reboot now, or Ctrl+C to reboot later." -n 1 -s
    sudo reboot
}

step_3_install_jack() {
    log "Step 3: Installing and configuring JACK Audio Server..."
    sudo apt install -y jackd2 build-essential git cmake pkg-config libasound2-dev libjack-jackd2-dev libsamplerate0-dev

    log "Configuring real-time priority for audio group..."
    sudo adduser "$USER" audio
    cat << 'EOF' | sudo tee /etc/security/limits.d/audio.conf > /dev/null
# Provided by the jackd package.
#
# Changes to this file will be preserved.
#
# If you want to enable/disable realtime permissions, run
#
#    dpkg-reconfigure -p high jackd2

@audio   -  rtprio     95
@audio   -  memlock    unlimited
#@audio   -  nice      -19
EOF

    log "Creating and enabling jackd service..."
    cat << EOF | sudo tee /etc/systemd/system/jackd.service > /dev/null
[Unit]
Description=JACK Audio Daemon
After=alsa-restore.service
Requires=alsa-restore.service

[Service]
User=$USER
Environment=JACK_NO_AUDIO_RESERVATION=1
LimitRTPRIO=95
LimitMEMLOCK=infinity
ExecStart=/usr/bin/jackd -P95 -d alsa -d hw:0 -r 48000 -p 128 -n 3
Restart=on-failure

[Install]
WantedBy=multi-user.target
EOF

    sudo systemctl daemon-reload
    sudo systemctl enable jackd.service
    sudo systemctl start jackd.service

    mark_done "step_3_install_jack"
    log "JACK installation and configuration complete."
}

step_4_install_camilladsp() {
    log "Step 4: Installing CamillaDSP..."

    if ! command -v cargo &> /dev/null; then
        log "Installing Rust and Cargo..."
        curl --proto '=https' --tlsv1.2 -sSf https://sh.rustup.rs | sh -s -- -y
        # Source the environment to update PATH for the new shell
        # and then re-execute the script to continue.
        log "Rust installation complete. Reloading script to continue..."
        exec bash -c "source \"$HOME/.cargo/env\"; exec \"$0\""
    fi

    log "Cloning and building CamillaDSP..."
    if [ ! -d "$HOME/camilladsp" ]; then
        git clone https://github.com/HEnquist/camilladsp.git "$HOME/camilladsp"
    fi
    cd "$HOME/camilladsp"
    RUSTFLAGS='-C target-feature=+neon -C target-cpu=native' cargo build --release --features jack-backend,websocket

    log "Creating directories and service file..."
    mkdir -p "$HOME/camilladsp/coeffs" "$HOME/camilladsp/configs"
    cat << EOF | sudo tee /lib/systemd/system/camilladsp.service > /dev/null
[Unit]
Description=CamillaDSP
After=default.target
StartLimitIntervalSec=10
StartLimitBurst=10

[Service]
Type=simple
User=$USER
WorkingDirectory=~
ExecStart=/home/$USER/camilladsp/target/release/camilladsp -s /home/$USER/camilladsp/statefile.yml -w -g-0 -o /home/$USER/camilladsp/camilladsp.log -p 1234
Restart=always
RestartSec=1
StandardOutput=journal
StandardError=journal
SyslogIdentifier=camilladsp
CPUSchedulingPolicy=fifo
CPUSchedulingPriority=10

[Install]
WantedBy=default.target
EOF

    log "Enabling and starting CamillaDSP service..."
    sudo systemctl daemon-reload
    sudo systemctl enable camilladsp.service
    sudo systemctl start camilladsp.service

    mark_done "step_4_install_camilladsp"
    log "CamillaDSP installation complete."
}

step_5_install_camillagui() {
    log "Step 5: Installing CamillaDSP GUI..."
    wget https://github.com/HEnquist/camillagui-backend/releases/download/v3.0.2/bundle_linux_aarch64.tar.gz -O "$HOME/camilladsp/bundle_linux_aarch64.tar.gz"
    sudo tar -xvf "$HOME/camilladsp/bundle_linux_aarch64.tar.gz" -C /opt/

    log "Setting up GUI service..."
    cat << EOF | sudo tee /lib/systemd/system/camillagui.service > /dev/null
[Unit]
Description=CamillaDSP Backend and GUI
After=default.target

[Service]
Type=idle
User=$USER
ExecStart=/opt/camillagui_backend/camillagui_backend

[Install]
WantedBy=default.target
EOF

    log "Enabling and starting GUI service..."
    sudo systemctl daemon-reload
    sudo systemctl enable camillagui.service
    sudo systemctl start camillagui.service

    mark_done "step_5_install_camillagui"
    log "CamillaDSP GUI installation complete."
}

step_6_kernel_downgrade() {
    log "Step 6: Downgrading kernel for Octo compatibility..."
    log "This is a critical step. Do not interrupt."
    sudo SKIP_INITRAMFS=1 rpi-update f5c4fc199c8d8423cb427e509563737d1ac21f3c
    mark_done "step_6_kernel_downgrade"
    log "Kernel downgrade complete. A final reboot is required."
    read -p "Press Enter to reboot now." -n 1 -s
    sudo reboot
}


# --- Main Execution Logic ---

# Clean up old state file if it exists
if [ -f "/tmp/audio_setup_state" ]; then
    rm "/tmp/audio_setup_state"
fi

log "Starting Octo audio setup script."

# Create state file if it doesn't exist
touch "$STATE_FILE"

# Execute steps sequentially
if ! is_done "step_1_update_system"; then
    step_1_update_system
fi

if ! is_done "step_2_configure_audio"; then
    step_2_configure_audio
fi

if ! is_done "step_3_install_jack"; then
    step_3_install_jack
fi

if ! is_done "step_4_install_camilladsp"; then
    step_4_install_camilladsp
fi

if ! is_done "step_5_install_camillagui"; then
    step_5_install_camillagui
fi

if ! is_done "step_6_kernel_downgrade"; then
    step_6_kernel_downgrade
fi

log "All setup steps are complete!"
log "You can verify the services with:
    sudo systemctl status jackd.service
    sudo systemctl status camilladsp
    sudo systemctl status camillagui"
log "The web interface should be available at: http://<your-pi-ip>:5005/gui/index.html"

rm "$STATE_FILE"
exit 0
Dann das Script in euer Userverzeichnis auf der SD Karte kopieren. (home/$USER)
Die SD in den RPi stecken und starten. Abwarten, bis das automatische Setup erledigt und der RPi im Netzwerk verfügbar ist.
Ein Terminal öffnen oder Windows PowerShell nutzen und mit dem RPi via SSH verbinden.
In meinem Fall sieht das so aus

Nach der Passworteingabe seid ihr verbunden und landet automatisch im Userverzeichnis.
Nun macht ihr das Script ausführbar (es erfolgt keine Bestätigung):
Code:
sudo chmod +x setup_octo_audio.sh
Jetzt das Script ausführen. Ihr werdet ab und zu nach Bestätigung gefragt. Immer "Ja" antworten! Neustarts wie gewünscht durchführen.
Nach einem Neustart das Script erneut ausführen - es geht automatisch an der korrekten Stelle weiter.
Code:
sudo ./setup_octo_audio.sh
Nach dem finalen Neustart checken, ob alle Services laufen:
Code:
sudo systemctl status jackd.service
sudo systemctl status camilladsp
sudo systemctl status camillagui
Jetzt im Browser das Camilla GUI aufrufen mit
Code:
http://<your-pi-ip>:5005/gui/index.html
Unter Playback und Capture Device JACK auswählen. Resampling deaktivieren!
Links unten auf "Apply to DSP" klicken.
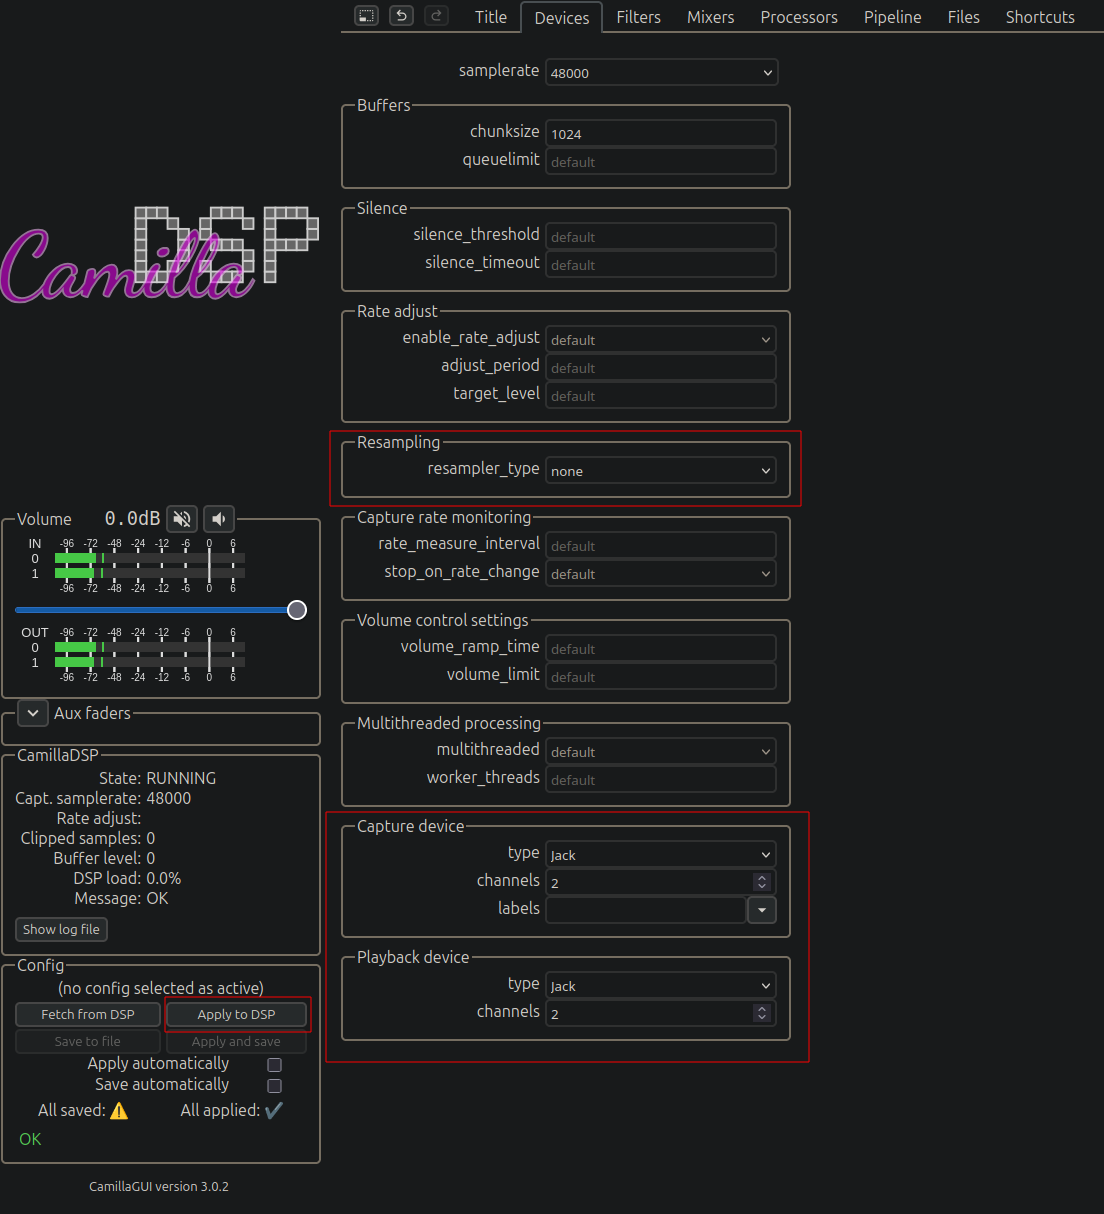
Dann unter Files euer Setup speichern und als active markieren (Stern Button).
Nun wird dieses Setup automatisch beim Booten geladen.

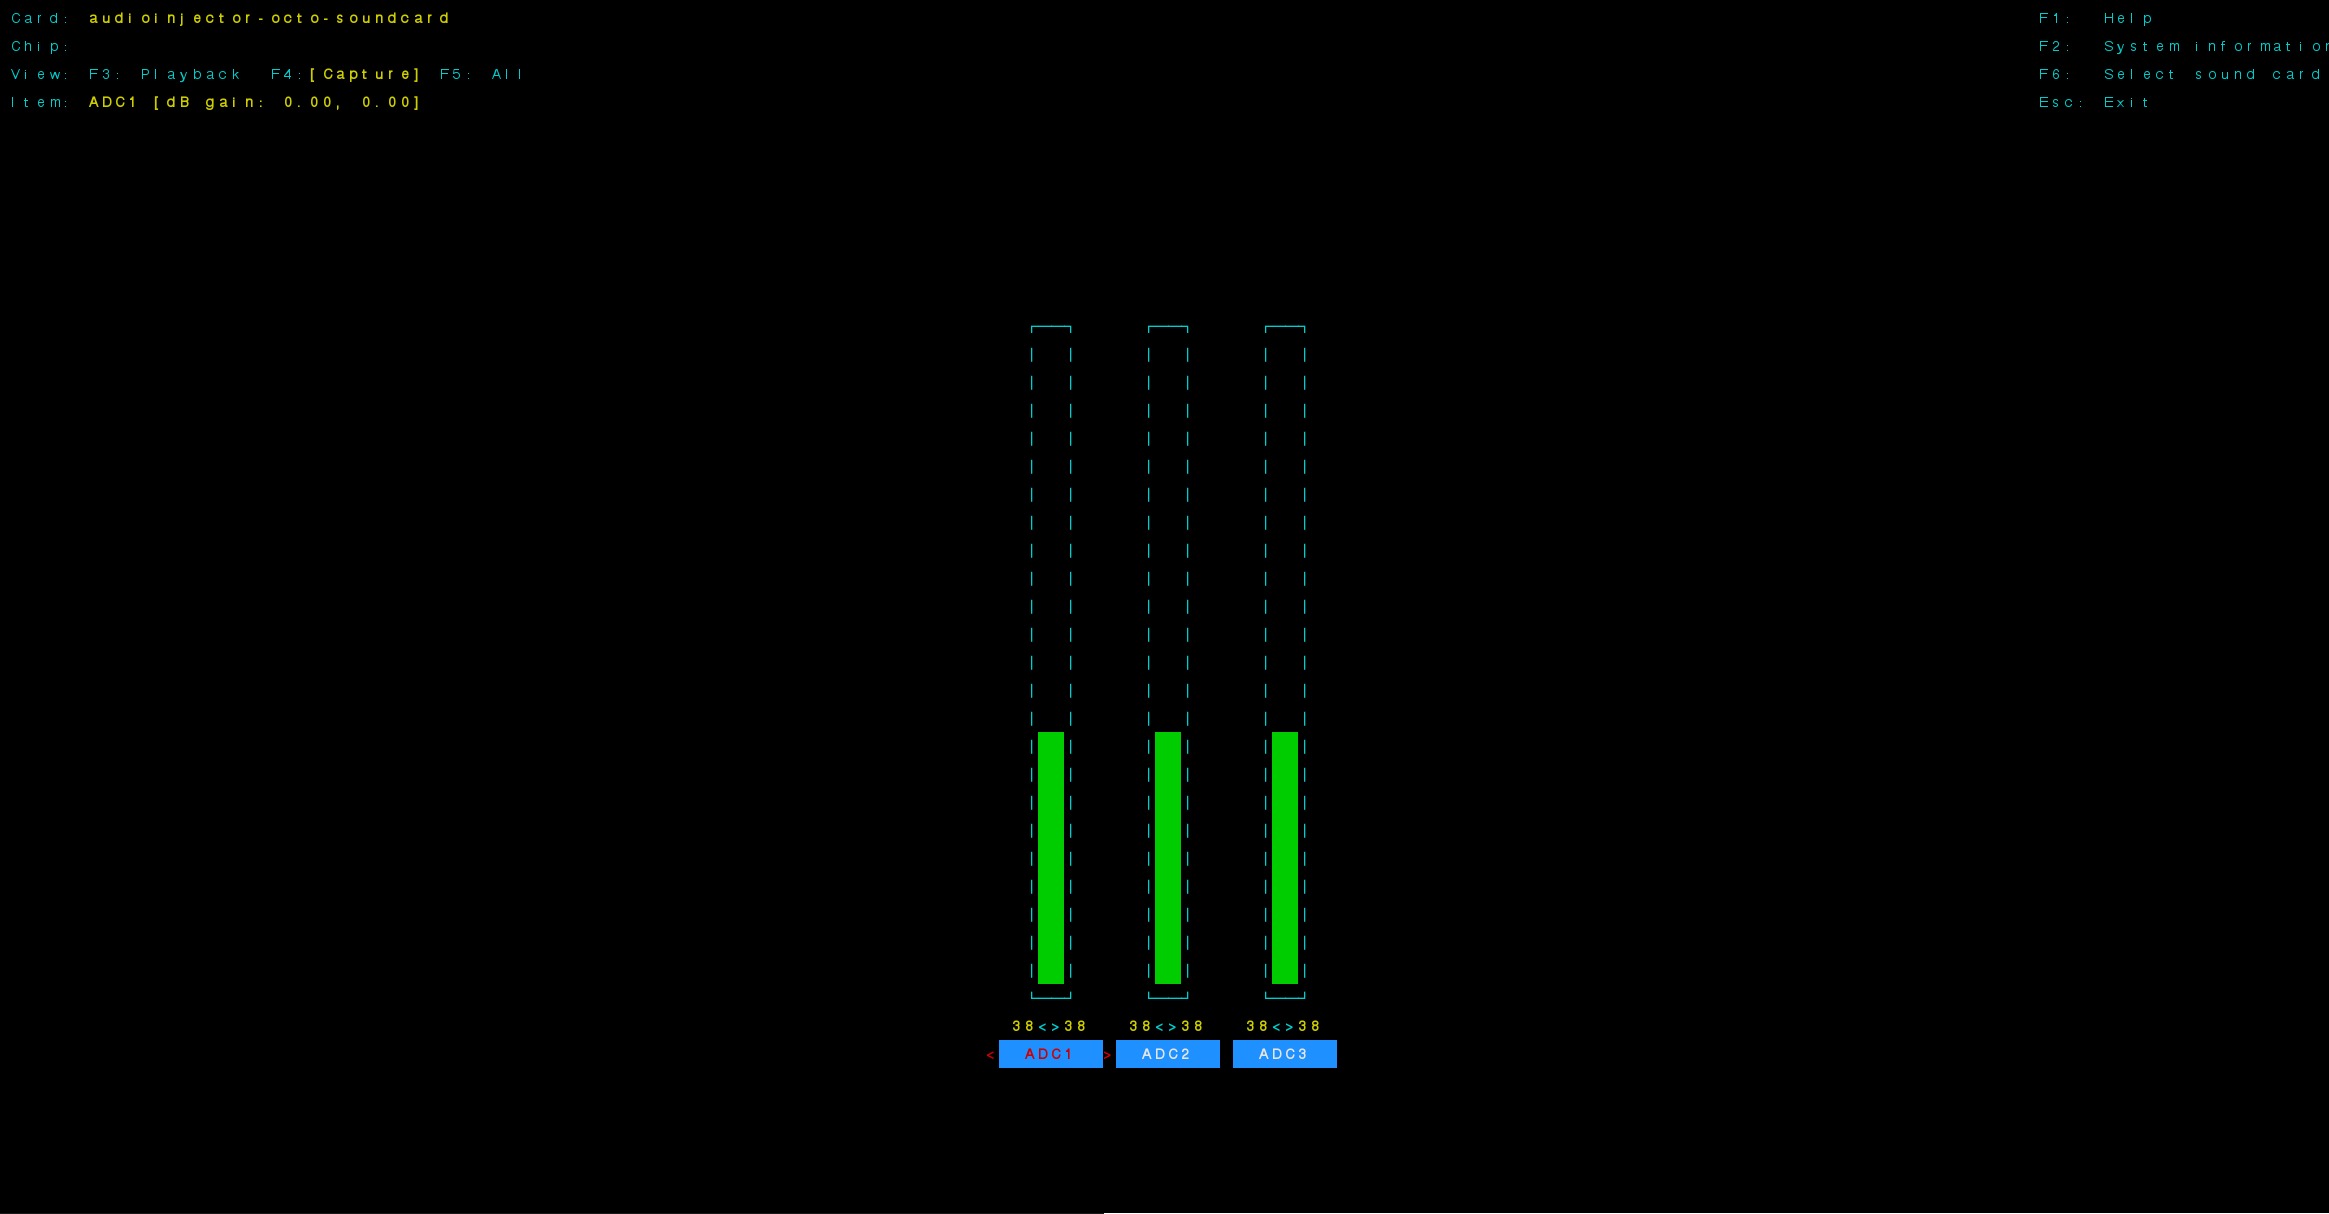
In alsamixer könnt ihr euren Eingangspegel festlegen. Im Terminal diesen Befehl eingeben und mit F4 die Capture Devices wählen.
Ich nutze hierzu einen 0dBfs Sinus und checke parallel im Camilla GUI, dass nichts clippt.
Nach dem Einpegeln mit ESC verlassen.
Voilà - ihr habt das Octo Interface mit CamillaDSP, JACK und einem simplen 2x2 Setup installiert!
Ab jetzt beginnt das Experimentieren.
Geändert von Malik (10.08.2025 um 02:38 Uhr)
-
-
Das Skript aus Post #8 enthielt einen Fehler. Hier ist die korrekte Version:
Code:
#!/bin/bash
#
# This script automates the installation of audio hardware and software
# for Octo audio on a Raspberry Pi running 64-bit Raspberry Pi OS Lite.
#
# It is designed to be idempotent, meaning it can be safely run multiple times.
# After a reboot is required, simply re-run the script to continue the setup.

set -e

# Determine the effective user. Prioritize the first script argument,
# then SUDO_USER, then the current USER. This makes the script's
# user context robust across re-executions.
if [ -n "$1" ]; then
    EFFECTIVE_USER=$1
else
    EFFECTIVE_USER=${SUDO_USER:-$USER}
fi
export EFFECTIVE_USER

STATE_FILE="/home/$EFFECTIVE_USER/.audio_setup_state"

# Function to log messages
log() {
    echo "[INFO] $(date +'%T') - $1"
}

# Function to check if a step is done
is_done() {
    grep -q "$1" "$STATE_FILE" 2>/dev/null
}

# Function to mark a step as done
mark_done() {
    echo "$1" >> "$STATE_FILE"
}

# --- Step Functions ---

step_1_update_system() {
    log "Step 1: Updating the system..."
    sudo apt update && sudo apt full-upgrade -y
    mark_done "step_1_update_system"
    log "System update complete."
}

step_2_configure_audio() {
    log "Step 2: Configuring audio in /boot/firmware/config.txt..."
    CONFIG_FILE="/boot/firmware/config.txt"

    # Ensure required dtparam entries exist and are not commented out
    sudo sed -i 's/^#*\s*dtparam=i2c_arm=on/dtparam=i2c_arm=on/' "$CONFIG_FILE"
    grep -q "^dtparam=i2c_arm=on" "$CONFIG_FILE" || echo "dtparam=i2c_arm=on" | sudo tee -a "$CONFIG_FILE" > /dev/null

    sudo sed -i 's/^#*\s*dtparam=i2s=on/dtparam=i2s=on/' "$CONFIG_FILE"
    grep -q "^dtparam=i2s=on" "$CONFIG_FILE" || echo "dtparam=i2s=on" | sudo tee -a "$CONFIG_FILE" > /dev/null

    sudo sed -i 's/^#*\s*dtparam=spi=on/dtparam=spi=on/' "$CONFIG_FILE"
    grep -q "^dtparam=spi=on" "$CONFIG_FILE" || echo "dtparam=spi=on" | sudo tee -a "$CONFIG_FILE" > /dev/null

    # Ensure dtparam=audio=on is commented out
    sudo sed -i 's/^\s*dtparam=audio=on/#dtparam=audio=on/' "$CONFIG_FILE"

    # Ensure vc4-kms-v3d,noaudio overlay is present and not duplicated
    if grep -q "^dtoverlay=vc4-kms-v3d" "$CONFIG_FILE"; then
        # Line exists, ensure it's correct
        sudo sed -i 's/\(dtoverlay=vc4-kms-v3d\).*/\1,noaudio/' "$CONFIG_FILE"
    else
        # Line does not exist, add it
        echo "dtoverlay=vc4-kms-v3d,noaudio" | sudo tee -a "$CONFIG_FILE" > /dev/null
    fi

    # Ensure audioinjector-addons overlay is present at the end
    grep -q "^dtoverlay=audioinjector-addons" "$CONFIG_FILE" || echo -e "\n# For Octo Audio\ndtoverlay=audioinjector-addons" | sudo tee -a "$CONFIG_FILE" > /dev/null

    mark_done "step_2_configure_audio"
    log "Audio configuration complete. A reboot is required."
    read -p "Press Enter to reboot now, or Ctrl+C to reboot later." -n 1 -s
    sudo reboot
}

step_3_install_jack() {
    log "Step 3: Installing and configuring JACK Audio Server..."
    sudo apt install -y jackd2 build-essential git cmake pkg-config libasound2-dev libjack-jackd2-dev libsamplerate0-dev

    log "Configuring real-time priority for audio group..."
    sudo adduser "$USER" audio
    cat << 'EOF' | sudo tee /etc/security/limits.d/audio.conf > /dev/null
# Provided by the jackd package.
#
# Changes to this file will be preserved.
#
# If you want to enable/disable realtime permissions, run
#
#    dpkg-reconfigure -p high jackd2

@audio   -  rtprio     95
@audio   -  memlock    unlimited
#@audio   -  nice      -19
EOF

    log "Creating and enabling jackd service..."
    cat << EOF | sudo tee /etc/systemd/system/jackd.service > /dev/null
[Unit]
Description=JACK Audio Daemon
After=alsa-restore.service
Requires=alsa-restore.service

[Service]
User=$EFFECTIVE_USER
Environment=JACK_NO_AUDIO_RESERVATION=1
LimitRTPRIO=95
LimitMEMLOCK=infinity
ExecStart=/usr/bin/jackd -P95 -d alsa -d hw:0 -r 48000 -p 128 -n 3
Restart=on-failure

[Install]
WantedBy=multi-user.target
EOF

    sudo systemctl daemon-reload
    sudo systemctl enable jackd.service
    sudo systemctl start jackd.service

    mark_done "step_3_install_jack"
    log "JACK installation and configuration complete."
}

step_4_install_camilladsp() {
    log "Step 4: Installing CamillaDSP..."

    if ! command -v cargo &> /dev/null; then
        log "Installing Rust and Cargo..."
        sudo -u "$EFFECTIVE_USER" curl --proto '=https' --tlsv1.2 -sSf https://sh.rustup.rs | sudo -u "$EFFECTIVE_USER" sh -s -- -y
        # Source the environment to update PATH for the new shell
        # and then re-execute the script to continue.
        log "Rust installation complete. Reloading script to continue..."
        exec sudo -u "$EFFECTIVE_USER" HOME="/home/$EFFECTIVE_USER" bash -c "source \"\$HOME/.cargo/env\"; exec \"$0\" \"$EFFECTIVE_USER\""
    fi

    log "Cloning and building CamillaDSP as user '$EFFECTIVE_USER'..."
    sudo -u "$EFFECTIVE_USER" bash <<END_USER_COMMANDS
    set -e
    source "/home/$EFFECTIVE_USER/.cargo/env"
    if [ ! -d "/home/$EFFECTIVE_USER/camilladsp" ]; then
        git clone https://github.com/HEnquist/camilladsp.git "/home/$EFFECTIVE_USER/camilladsp"
    fi
    cd "/home/$EFFECTIVE_USER/camilladsp"
    RUSTFLAGS='-C target-feature=+neon -C target-cpu=native' cargo build --release --features jack-backend,websocket
    mkdir -p "/home/$EFFECTIVE_USER/camilladsp/coeffs" "/home/$EFFECTIVE_USER/camilladsp/configs"
END_USER_COMMANDS
    cat << EOF | sudo tee /lib/systemd/system/camilladsp.service > /dev/null
[Unit]
Description=CamillaDSP
After=default.target
StartLimitIntervalSec=10
StartLimitBurst=10

[Service]
Type=simple
User=$EFFECTIVE_USER
WorkingDirectory=/home/$EFFECTIVE_USER
ExecStart=/home/$EFFECTIVE_USER/camilladsp/target/release/camilladsp -s /home/$EFFECTIVE_USER/camilladsp/statefile.yml -w -g-0 -o /home/$EFFECTIVE_USER/camilladsp/camilladsp.log -p 1234
Restart=always
RestartSec=1
StandardOutput=journal
StandardError=journal
SyslogIdentifier=camilladsp
CPUSchedulingPolicy=fifo
CPUSchedulingPriority=10

[Install]
WantedBy=default.target
EOF

    log "Enabling and starting CamillaDSP service..."
    sudo systemctl daemon-reload
    sudo systemctl enable camilladsp.service
    sudo systemctl start camilladsp.service

    mark_done "step_4_install_camilladsp"
    log "CamillaDSP installation complete."
}

step_5_install_camillagui() {
    log "Step 5: Installing CamillaDSP GUI..."
    sudo -u "$EFFECTIVE_USER" wget https://github.com/HEnquist/camillagui-backend/releases/download/v3.0.2/bundle_linux_aarch64.tar.gz -O "/home/$EFFECTIVE_USER/camilladsp/bundle_linux_aarch64.tar.gz"
    sudo tar -xvf "/home/$EFFECTIVE_USER/camilladsp/bundle_linux_aarch64.tar.gz" -C /opt/

    log "Setting up GUI service..."
    cat << EOF | sudo tee /lib/systemd/system/camillagui.service > /dev/null
[Unit]
Description=CamillaDSP Backend and GUI
After=default.target

[Service]
Type=idle
User=$EFFECTIVE_USER
ExecStart=/opt/camillagui_backend/camillagui_backend

[Install]
WantedBy=default.target
EOF

    log "Enabling and starting GUI service..."
    sudo systemctl daemon-reload
    sudo systemctl enable camillagui.service
    sudo systemctl start camillagui.service

    mark_done "step_5_install_camillagui"
    log "CamillaDSP GUI installation complete."
}

step_6_kernel_downgrade() {
    log "Step 6: Downgrading kernel for Octo compatibility..."
    log "This is a critical step. Do not interrupt."
    sudo SKIP_INITRAMFS=1 rpi-update f5c4fc199c8d8423cb427e509563737d1ac21f3c
    mark_done "step_6_kernel_downgrade"
    log "Kernel downgrade complete. A final reboot is required."
    read -p "Press Enter to reboot now." -n 1 -s
    sudo reboot
}


# --- Main Execution Logic ---

# Clean up old state file if it exists
if [ -f "/tmp/audio_setup_state" ]; then
    rm "/tmp/audio_setup_state"
fi

log "Starting Octo audio setup script."

# Create state file if it doesn't exist
# Create state file if it doesn't exist, ensuring correct ownership.
if [ ! -f "$STATE_FILE" ]; then
    sudo -u "$EFFECTIVE_USER" touch "$STATE_FILE"
fi

# Execute steps sequentially
if ! is_done "step_1_update_system"; then
    step_1_update_system
fi

if ! is_done "step_2_configure_audio"; then
    step_2_configure_audio
fi

if ! is_done "step_3_install_jack"; then
    step_3_install_jack
fi

if ! is_done "step_4_install_camilladsp"; then
    step_4_install_camilladsp
fi

if ! is_done "step_5_install_camillagui"; then
    step_5_install_camillagui
fi

if ! is_done "step_6_kernel_downgrade"; then
    step_6_kernel_downgrade
fi

log "All setup steps are complete!"
log "You can verify the services with:
    sudo systemctl status jackd.service
    sudo systemctl status camilladsp
    sudo systemctl status camillagui"
log "The web interface should be available at: http://<your-pi-ip>:5005/gui/index.html"

rm "$STATE_FILE"
exit 0
Forumregeln
- Es ist dir nicht erlaubt, neue Themen zu verfassen.
- Es ist dir nicht erlaubt, auf Beiträge zu antworten.
- Es ist dir nicht erlaubt, Anhänge hochzuladen.
- Es ist dir nicht erlaubt, deine Beiträge zu bearbeiten.
-
Foren-Regeln
|


 Mit Zitat antworten